
Randomization In Informatica Cloud (IDMC)
February 18, 2019
Indirect loading for flat files of Informatica PowerCenter!
March 1, 2019Problem Description-
Informatica Cloud File Processor Connector Several times a user would want to upload and download files from the remote machine to a local machine using FTP/SFTP. As to transferring files from the Protocol system the user needs privileges along with a proper connector to transfer a file from the Informatica platform to another system or vice versa.
Challenges to User/Developer-
- The above problem can be resolved with the help of the Informatica file processor Connector.
- The User needs to create a connection with appropriate credentials to transfer files between two platforms.
- Need to test the connections.
Solution
Informatica Cloud File Processor Connector
Approach-
- You can use File Processor Connector to perform the file transfer. You perform FTP and SFTP transfer to upload or download files from your remote machine to the local machine with File Processor Connector.
- You can do encryption and decryption of files with a File processor. You can also copy, rename, move, compress, decompress, encrypt, archive, and unarchive files with File Processor Connector.
- Informatica Connector for File Processor helps customers in managing the file system.
Technical Solution –
1) Create the Connection (This will end up being the ‘Source Connection’)
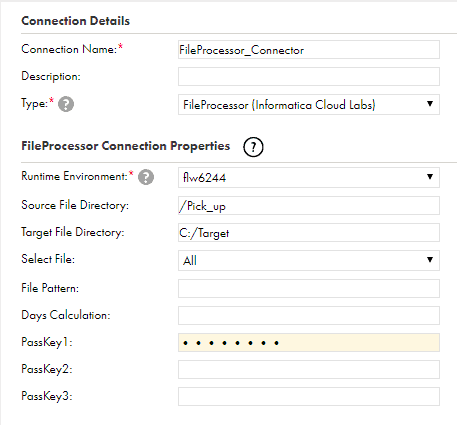
- Pick your secure agent. The ‘Source File Directory’ should have a ‘/’ in front of it if you are using a sub-directory.
- The ‘Target File Directory’ is a directory on the same server as the security agent. The ‘Select -File’ drop-down is great because you can specify all kinds of filters on what type of files to download.
- In this screenshot, I chose ‘Select File’. I have left nothing in the File pattern so all kinds of files should be selected.
- Relied more on the ‘Filename’ data filter in ‘Step 4’ below, but it is nice to have options. Also, put your password in the PassKey1 field so it can be used later.
2) Create another Connection (This will end up being the ‘Target Connection’)
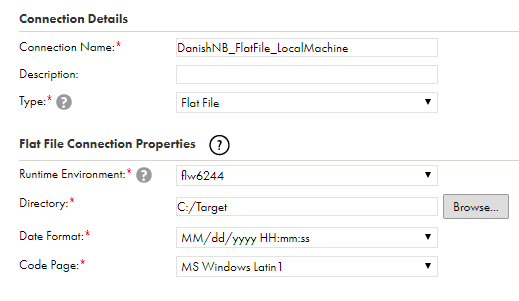
- In the new connection that will be used for the ‘Target’, we need to specify the directory where the files should be saved.
- The ‘Type’ drop-down should be ‘Flat File’ and the ‘Directory’ should be the directory to which the files should be copied.
3) Create the ‘Data Synchronization Task
Step 1 – Definition
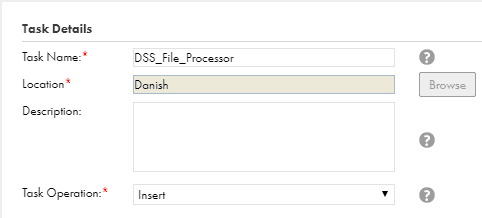
Give the task a name and description and then specify it as in the ‘Insert’ job.
Step 2 – Source

In the Connection, drop-down select the ‘File Process Connector’ connection created in#1.
The ‘Source Object’ pick-list should be set to ‘SFTP_GET’.
Step 3 – Target

In the Connection, the drop-down specifies the ‘Flat File’ connector that was created in #2. The Target Object selected should be Infa_SFTP_GET.csv.
Step 4 – Data Filters
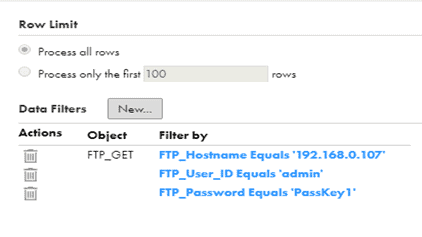
- We need to Select to process all rows to get complete data from the source.
- As filters are the certain conditions depend on that the connection enters to SFTP server with respective Hostname, user name, and password.
Step 5 – Field Mapping
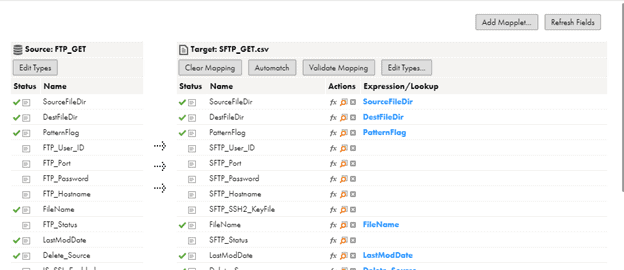
- The field mapping should be done for you. The Source and the Target fields are the same.
- After the field mapping the schedule options will come to set and appropriate timing for the job to run, we can schedule or can run Manually.
Advantage –
The main Advantage of this process is that the random data can be shared from A FTP location to some other location. As SFTP is a very protective way to transfer data from one location to another.
Issues –
None
Conclusion:
Informatica Cloud File Processor Connector The file will be moved from the SFTP location to the target directory with a secure protocol.


